
















How to Install a 12.3-Inch Digital Cluster in a Mercedes W205 or GLC X253: 16 Steps, Fitment Checks and Long-Term Support
16-Step Mercedes-Benz Installation Guide
Install the Right Digital Cluster—and Keep It Working
Follow the photographed board-transfer route for a 12.3-inch Mercedes W205 or GLC X253 digital instrument cluster, confirm the correct vehicle version before ordering, and retain access to installation, setup, software and later troubleshooting support.
- 16 photographed removal, transfer and installation steps
- Dedicated 2017 and broader 2015–2018 NTG5.0 purchase routes
- CarPlay, Android Auto and supported navigation-display checks
- Vehicle-specific confirmation and long-term iKAGOO support
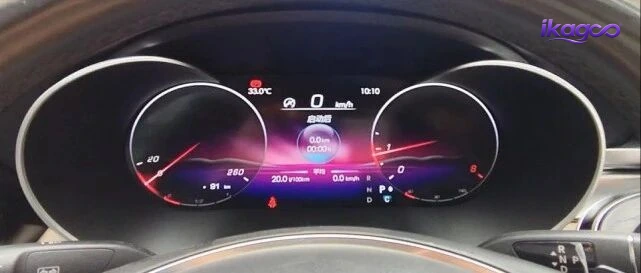
Choose the correct purchase route
Do not choose by dashboard appearance alone. Match the production year, original NTG system, steering position, cluster and connector route.
2017 W205 / GLC X253 NTG5.0
Use this product page for vehicles confirmed against the dedicated 2017 configuration.
View the 2017 Version2015–2018 W205 / X253 NTG5.0
Use this product page for vehicles confirmed against the broader 2015–2018 configuration.
View the 2015–2018 VersionNot sure which route matches your car? Submit the vehicle and original-cluster photos before ordering.
Kort svar
Can a Mercedes W205 or GLC X253 be upgraded to a 12.3-inch digital instrument cluster?
Yes, when the exact vehicle and original system are confirmed. The two iKAGOO purchase routes linked in this guide cover a dedicated 2017 Mercedes-Benz C-Class W205 / GLC X253 NTG5.0 version and a broader confirmed 2015–2018 W205 / X253 NTG5.0 version. It replaces the original analog cluster with a 12.3-inch digital display, retains the required original cluster electronics, uses matched adapters, and provides supported vehicle data plus connected CarPlay, Android Auto and navigation-display functions after correct setup.
12.3-inch Digital Cluster
Vehicle-specific digital cockpit retrofit installed in the original driver-display position.
CarPlay & Android Auto
Connected phone functions through the confirmed compatible system and display route.
Map / Navigation Display
Supported map or navigation information through the matched connection route.
Originaldata för fordonet
Speed, RPM, gear, fuel, temperature, warnings and supported controls remain part of the required test.
- Vehicle entities
- Mercedes-Benz C-Class W205 and Mercedes-Benz GLC X253
- Confirmed linked route
- 2015–2018 · NTG5.0 · LHD or RHD after vehicle review
- Installation method
- Original cluster removal, factory-electronics transfer, matched adapter connection and complete testing
- Installationsnivå
- Level 3 / 5 Advanced DIY or professional automotive-electronics installation
- Product entity
- 12.3-inch vehicle-specific digital instrument cluster / digital cockpit retrofit
- Connected functions
- CarPlay, Android Auto and supported map or navigation information through the confirmed route
- Ursprungliga funktioner
- Vehicle data, warnings, gear, fuel, temperature and supported steering controls must remain correct
- Support path
- Pre-order matching, installation help, setup, software assistance, troubleshooting and warranty coordination
Read this boundary first
This is not one universal procedure for every W205 or X253
The source tutorial was labelled for broader W205 and X253 years and mentioned NTG5.0, NTG5.5 and NTG6.0. That label must not be treated as universal compatibility. The purchase links in this article include a dedicated 2017 W205 / X253 NTG5.0 route and a broader 2015–2018 W205 / X253 NTG5.0 route. Later NTG5.5 or NTG6.0 vehicles, regional versions, different original clusters or previous aftermarket work may require different hardware, wiring, coding or installation instructions.
Confirm the exact route before using these steps
Send iKAGOO the vehicle model, production year, market region, LHD or RHD position, a complete dashboard photo, the original cluster switched on, and connector photos when requested. Continue only after the supplied cluster and harness are confirmed for the vehicle. This review is not a sales obstacle; it creates the vehicle record that makes correct preparation and later support possible.
The real reasons to upgrade
What the 12.3-inch digital cluster changes in daily driving
The screen size is only the visible part of the upgrade. The real value is a modern driver display that remains connected to the vehicle, presents essential information in the driver's line of sight, and can integrate supported phone and navigation content after the correct vehicle-specific setup.
A complete digital-cockpit transformation
The original analog cluster is replaced in its factory location by a 12.3-inch digital display. The result looks integrated into the dashboard instead of appearing as an added tablet.
CarPlay, Android Auto and navigation information
On the confirmed configuration, supported CarPlay, Android Auto and map or navigation information can be displayed through the digital-cluster route. This is a connected display function; it must not be described as the cluster running every phone or map function independently.
Essential original vehicle data remains central
Speed, RPM, fuel, coolant temperature, gear, indicators, warnings and supported steering-wheel controls remain part of the required post-installation test. A digital design is not acceptable if critical information becomes unreliable.
A vehicle-specific retrofit, not a universal screen
The route shown uses original Mercedes cluster electronics, a matched LCD housing, vehicle-specific connectors and the correct CANBUS or configuration path after confirmation.
No intentional cutting in the supported route
The intended installation uses matched plugs and adapters without intentional cutting of the factory main harness. Any connector mismatch, repinning request or forced fit is a stop condition.
Long-term technical support is part of the product
This category may require later software, configuration, map-display, phone-integration or fault-diagnosis help. The value of the purchase therefore depends on who can still support the unit after the parcel has arrived.
Varför handla hos iKAGOO?
A digital cluster needs support beyond the day it is installed
A digital instrument cluster is not a disposable accessory. It communicates with vehicle systems, carries safety-critical driving information and may need vehicle-specific configuration, software adjustment or troubleshooting during its service life. Buying the cheapest hardware without a continuing support path can leave the owner with a unit that physically fits but cannot be correctly configured, updated or diagnosed later.
iKAGOO support does not end when the parcel arrives
The purchase combines the confirmed hardware with a continuing technical-support path. iKAGOO keeps the order, vehicle and supplied-version context so later questions do not have to begin from zero. When an issue appears, support can use the original configuration, installation evidence and software information to distinguish a wiring problem from a settings, software or hardware problem.
The hardware alone is not the complete solution
A seller may be able to ship a cluster without being able to identify the correct software, explain the board-transfer route or diagnose a warning months later. For this product category, technical continuity is part of usable product value.
Long-term support protects the installation investment
When a new phone, software version, configuration change or unexpected fault affects the system, having the matched order and product history can prevent unnecessary removal, repurchasing or trial-and-error replacement.
Support remains evidence-based
Long-term support does not mean guessing. Customers should retain the order number and provide clear photos, continuous video, settings pages and fault details so the cause can be separated accurately.
What customers are really buying
The purchase is not only a 12.3-inch screen. It is a vehicle-specific upgrade path: compatibility confirmation, correct hardware, installation guidance, setup assistance, later troubleshooting and warranty coordination when the evidence shows an eligible hardware issue.
Installation gate
Compatibility review before the dashboard is opened
Model and year are not enough by themselves. A professional review should identify the exact cluster architecture and the functions that must remain correct after installation.
Confirm Mercedes-Benz C-Class W205 or Mercedes-Benz GLC X253.
Match the model year and sales region to the correct product route.
Confirm the original Mercedes system route, including the NTG version.
Confirm steering position and dashboard configuration before the correct version is supplied.
Declare earlier aftermarket work because it can change the connector, configuration and installation route.
Förberedelser
Tools and working conditions
Trim and fastener tools
- Plastic non-marring trim tools
- Correctly fitting driver or Torx-bit set
- Magnetic screw tray or labelled containers
- Inspection light
Protection and documentation
- Microfibre cloth and padded work surface
- Suitable anti-static precautions
- Phone or camera for connector and warning references
- Original product instructions and vehicle-specific confirmation
Installer requirement
This is Level 3 Advanced DIY. The installer should be comfortable with dashboard trim, delicate electronics, connector inspection and safety-critical function testing. Use an automotive-electronics installer when the vehicle history or wiring route is uncertain.
Do not begin with the vehicle energised
Switch off the ignition and follow the applicable Mercedes service procedure. Do not disconnect the cluster while powered. Battery disconnection should follow the correct vehicle procedure and should not be improvised.
Complete installation path
16-step Mercedes W205 digital cluster installation
Each step below explains the purpose, the physical action, what the source image proves, the completion check and the error that should stop or slow the work.
Installation step 1 of 16
Record the original cluster and power the vehicle down
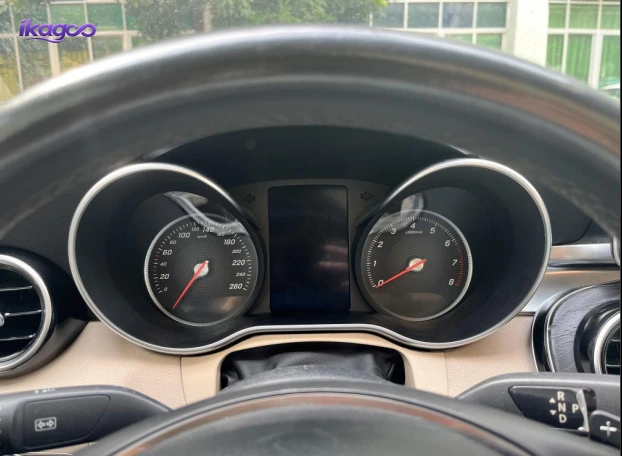
Syfte
Create a reference for the original warning lights, mileage, trim position and connector route before anything is removed.
Åtgärd
Photograph the complete original cluster while it is switched on, then switch off the ignition, remove the key or move the key away from the vehicle, and wait for the vehicle electronics to shut down. Follow the applicable Mercedes service procedure before disconnecting any cluster connector. Do not unplug the instrument cluster while it is powered.
Completion check
You have clear reference photos, the ignition is off and the cluster is no longer active.
Common error or risk
Skipping the reference photos makes later warning, mileage and trim comparisons harder. Disconnecting a live cluster can create faults or damage.
Installation step 2 of 16
Release the lower trim beside the steering column
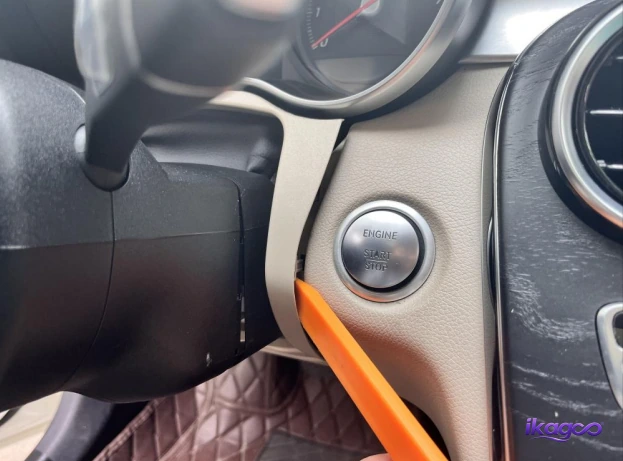
Syfte
Expose the lower edge of the cluster area without damaging the visible dashboard trim.
Åtgärd
Use a plastic trim tool at the seam shown beside the steering column and start button. Work gradually along the edge instead of levering hard at one point. Keep the tool shallow so it releases the trim clips rather than marking the leather, painted surface or switch panel.
Completion check
The lower trim is free enough to reveal the instrument-cluster mounting area, with no broken clips.
Common error or risk
A metal screwdriver or excessive force can scratch the dashboard, crack the panel or distort the trim.
Installation step 3 of 16
Remove the two lower cluster mounting screws
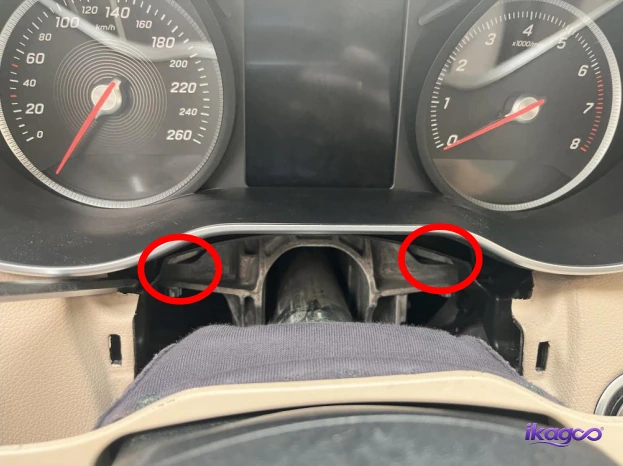
Syfte
Release the mechanical fasteners that hold the original cluster in the dashboard.
Åtgärd
Use the correctly fitting driver or Torx bit for the two screws marked below the cluster. Support the screw head squarely and store both fasteners in a magnetic tray or labelled container. Do not substitute an oversized or undersized bit.
Completion check
Both screws are removed without damaged heads and are retained for reinstallation.
Common error or risk
A rounded screw head can stop the installation. A dropped screw can become a rattle or lodge inside the steering-column area.
Installation step 4 of 16
Release the upper edge of the original cluster
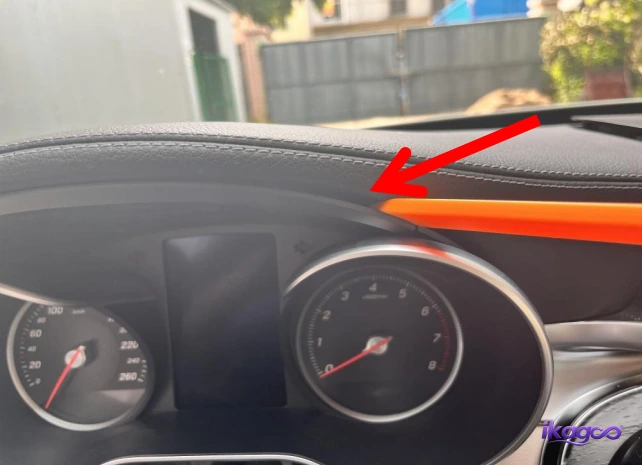
Syfte
Free the cluster housing from the dashboard after the lower screws have been removed.
Åtgärd
Apply controlled pressure at the upper edge shown by the arrow. Pull the cluster evenly and keep the steering wheel positioned to provide clearance. Do not twist one side far ahead of the other, because the housing and surrounding trim can bind.
Completion check
The cluster can move forward evenly and the surrounding trim remains intact.
Common error or risk
Forcing the unit while a screw or clip is still engaged can crack the housing or dashboard surround.
Installation step 5 of 16
Pull the original cluster forward and disconnect it
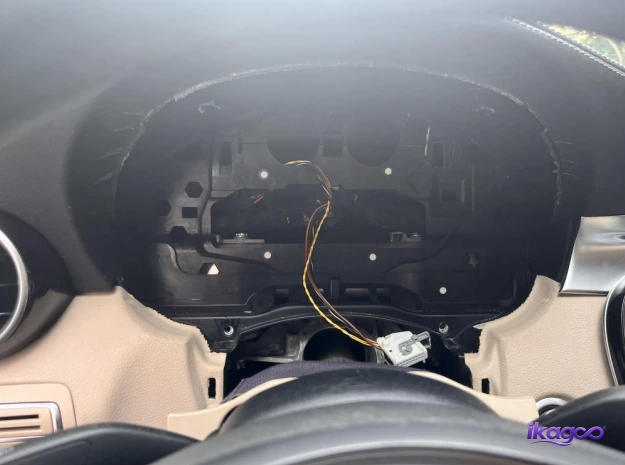
Syfte
Remove the original instrument assembly while preserving its connector, wiring and reusable internal components.
Åtgärd
Draw the cluster forward only far enough to access the rear connector. Photograph the connector position before release. Unlock the connector by its proper latch and support the harness; never pull on the wires. Place the removed cluster on a clean, padded, static-safe work surface.
Completion check
The connector and pins are undamaged, the harness is not stretched and the cluster is safely supported.
Common error or risk
Pulling the harness, bending pins or allowing the cluster lens to rest face-down can create avoidable damage.
Installation step 6 of 16
Remove the six screws from the rear cluster housing
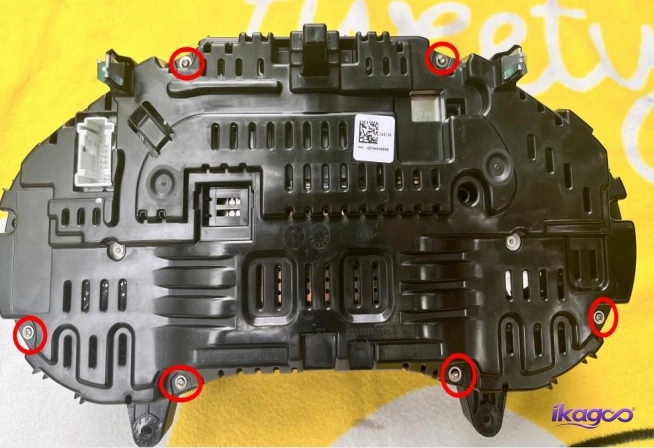
Syfte
Open the original housing so the required factory assembly can be transferred to the new LCD cluster.
Åtgärd
Place the cluster rear-side up on a soft surface. Remove the six screws marked in the image, noting their positions and any length differences. Keep the screws grouped separately from the two dashboard fasteners.
Completion check
All six screws are removed and the rear cover is free without stripped threads.
Common error or risk
Mixing screw lengths or overtightening during reassembly can damage plastic posts or prevent the housing from seating.
Installation step 7 of 16
Separate the rear cover, front mask and gauge assembly
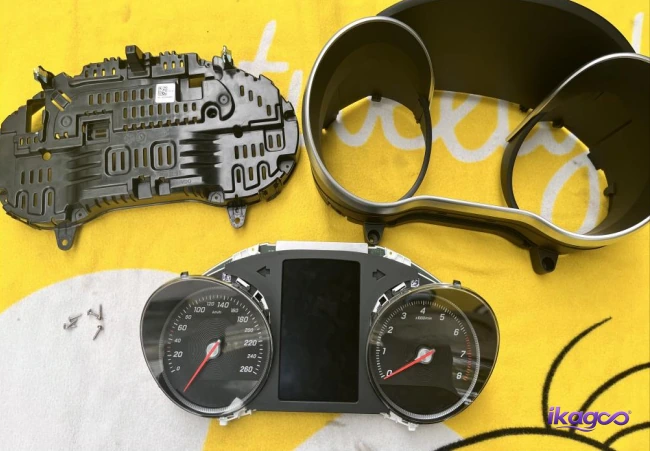
Syfte
Identify which original parts must be retained and which parts are replaced by the new digital-cluster housing.
Åtgärd
Lift the rear cover and front mask apart carefully. Keep the original gauge assembly flat and avoid touching circuit-board contacts, display surfaces or needle mechanisms. Compare the supplied LCD housing with the original parts before moving anything further.
Completion check
The parts are separated without broken clips, torn ribbon cables or contamination.
Common error or risk
Rushing this stage can damage the original board, clips or gauge assembly that the new cluster route depends on.
Installation step 8 of 16
Release the retaining clips around the original cluster face
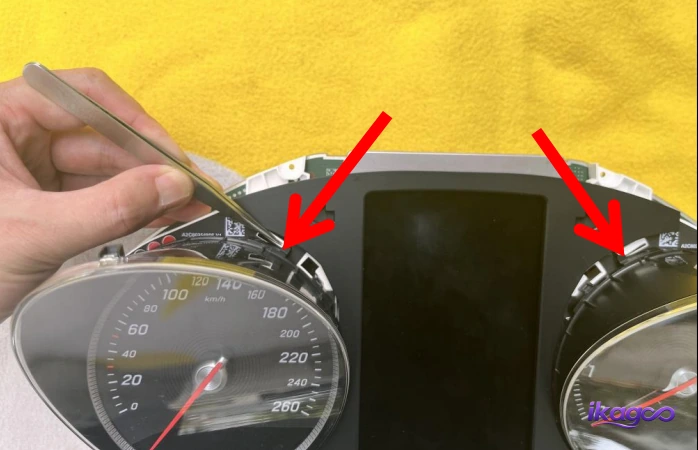
Syfte
Free the original internal assembly without cracking the surrounding plastic.
Åtgärd
Use a non-marring tool to release the retaining tabs shown by the arrows. Work around the perimeter one tab at a time while supporting the assembly. Do not bend a tab farther than necessary and do not lever against the gauge needles.
Completion check
All required tabs are released and the internal assembly lifts without resistance.
Common error or risk
A broken tab can cause poor fit, movement or rattles. Contact with the needles can change calibration or damage the original cluster.
Installation step 9 of 16
Prepare the original instrument assembly for transfer
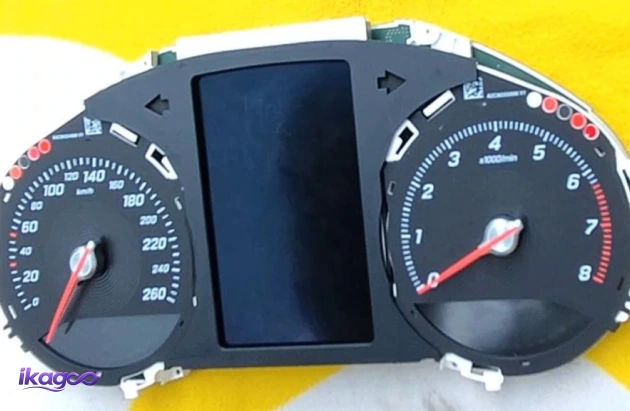
Syfte
Preserve the original vehicle-specific electronics and data route required by this installation method.
Åtgärd
Place the released original assembly on a clean anti-static surface. Confirm that it matches the transfer route specified for the supplied iKAGOO cluster. Do not assume that every W205, X253 or NTG version uses the same board-transfer method.
Completion check
The assembly is intact, correctly identified and ready for the next stage without loose parts.
Common error or risk
Using a board or housing from a different cluster version can produce no display, incorrect data or unresolved warning behaviour.
Installation step 10 of 16
Transfer the original cluster mainboard to the LCD housing
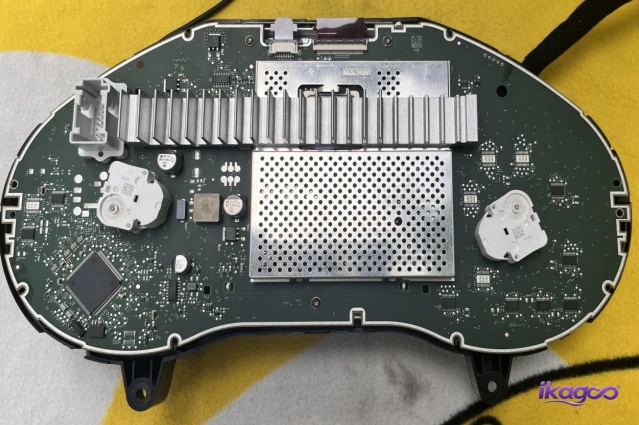
Syfte
Carry the required original vehicle electronics into the new digital-cluster assembly.
Åtgärd
Handle the original mainboard only by its edges and use suitable electrostatic precautions. Fit it into the new LCD housing exactly as specified for the supplied unit, then connect the dedicated display and power interfaces. Every connector must seat straight and lock without force.
Completion check
The board sits flat, mounting points align and every required connector is fully latched.
Common error or risk
Static discharge, reversed connectors, trapped ribbon cables or forcing a plug can damage both the original board and the new display.
Installation step 11 of 16
Refit the rear cover and secure the new assembly
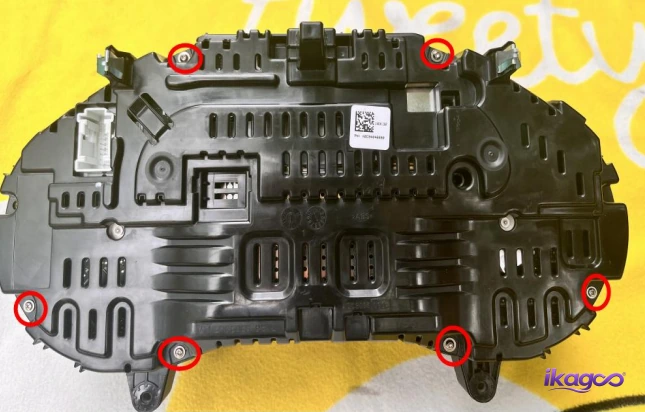
Syfte
Close and support the transferred electronics inside the new cluster housing.
Åtgärd
Inspect the perimeter for trapped wires, then refit the rear cover. Reinstall the six housing screws evenly, tightening them only until the cover is secure. Confirm that no cable is pinched between the cover and housing.
Completion check
The housing closes flush, all six screws are installed and no wiring is visible at the seam.
Common error or risk
Pinched wiring can cause intermittent faults. Excess torque can crack the mounting posts.
Installation step 12 of 16
Connect the supplied adapter to the factory cluster plug
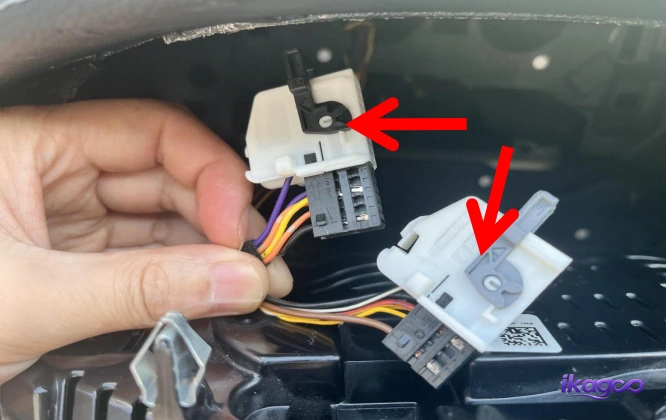
Syfte
Interface the vehicle harness with the matched digital-cluster connection route without altering the factory main harness.
Åtgärd
Compare the original plug and supplied adapter before connection. Check shell shape, keying, latch position and pin alignment. Connect only when the parts match naturally. The intended supported route does not require intentional cutting of the factory main harness.
Completion check
The adapter locks securely, pins remain straight and the connector does not need pressure or modification.
Common error or risk
If the connector shape or pin route differs, stop. Never shave, repin, splice or force a mismatch without written vehicle-specific instructions.
Installation step 13 of 16
Transfer and connect the cluster power lead
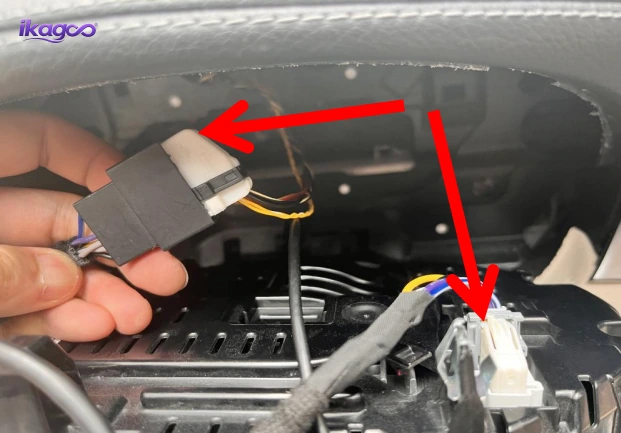
Syfte
Provide the matched power and signal route required by the new LCD display.
Åtgärd
Route the supplied power lead and secondary connector as shown, keeping the cable away from sharp edges, moving steering components and screw points. Confirm every plug is in the correct socket and that the latch is engaged.
Completion check
All required plugs are locked, the harness has strain relief and no cable is under tension.
Common error or risk
A partially seated power connector can cause a black screen, resets or heat. A trapped harness can fail after the trim is reinstalled.
Installation step 14 of 16
Position the digital cluster and reinstall the two lower screws
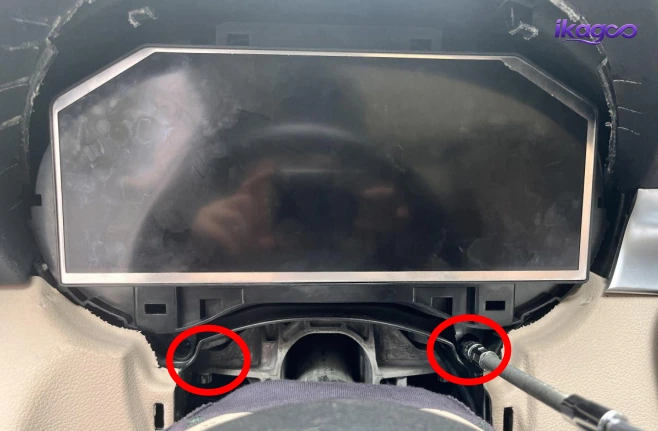
Syfte
Secure the new cluster in the original dashboard mounting points while keeping the wiring protected.
Åtgärd
Before tightening, place the cluster in the opening and check the rear harness for clearance. Reinstall the two original lower screws evenly. The cluster should sit naturally in the opening without being pulled into position by the screws.
Completion check
The cluster is stable, centred and flush, and the harness is not pinched behind it.
Common error or risk
Using the screws to force a misaligned housing can crack the frame or hide an incorrect fitment.
Installation step 15 of 16
Install the digital-cluster mask and inspect the trim fit
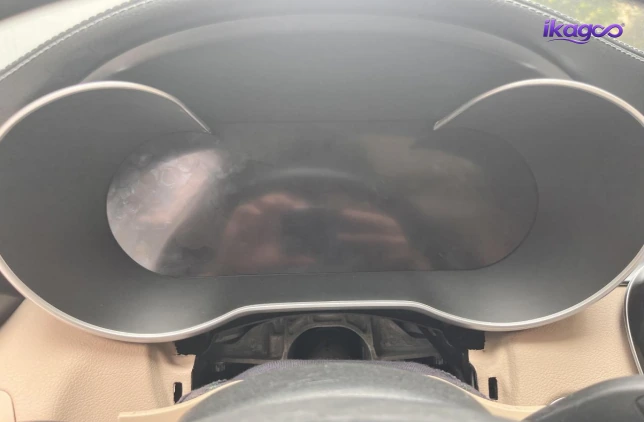
Syfte
Complete the visible dashboard integration and confirm an OEM-style physical result.
Åtgärd
Fit the supplied digital-cluster mask around the display, engaging each clip in sequence. Check the top edge, lower edge and both corners before applying pressure. Refit the lower trim only after the initial electrical test succeeds.
Completion check
The mask sits evenly with consistent gaps and does not press on the display.
Common error or risk
Uneven gaps usually indicate a trapped cable, unseated clip or wrong housing. Do not keep pressing until the cause is identified.
Installation step 16 of 16
Power on and complete the full function test
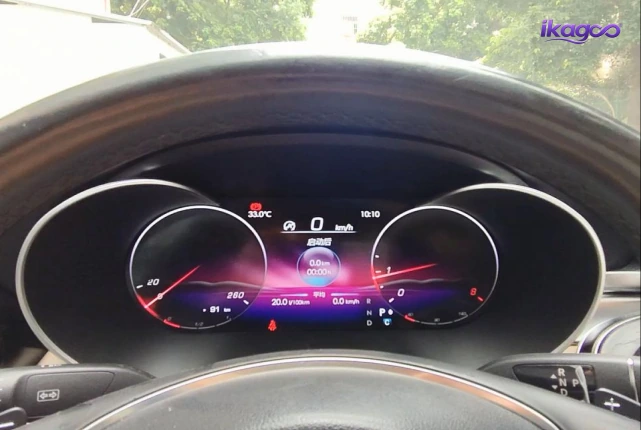
Syfte
Verify that the new display is safe, stable and correctly matched before the dashboard is fully reassembled.
Åtgärd
Switch the vehicle on and compare the new cluster with the original reference photos. Check speed, RPM, fuel, temperature, gear, turn signals, high beam, seat-belt status, warning information, steering-wheel controls and parking information. Test CarPlay or Android Auto only when that function is included in the confirmed configuration. Complete sleep and restart checks before closing all trim.
Completion check
All applicable driving data and warnings are correct, the screen is stable and the trim can be closed without pressure.
Common error or risk
Do not drive while relying on the upgraded cluster if critical information is missing, incorrect, flickering, black or repeatedly restarting.
Stop conditions
Stop the installation instead of forcing the next step
Before closing the dashboard
Installation and safety test checklist
Test the cluster before the final trim is closed. Compare each applicable result with the original vehicle reference and the confirmed product functions.
Safety-critical display fault
If the upgraded cluster incorrectly shows or fails to show speed, gear, fuel, temperature, indicators, braking, engine, ABS, airbag or another critical warning, stop using it. Restore the original cluster where technically possible and contact iKAGOO with continuous video and installation evidence.
Common installation faults
Troubleshooting before contacting support
No power or black screen
Switch the vehicle off. Recheck the matched adapter, power lead, connector locks, pins, fuse state and original-board seating. Do not repeatedly cycle the ignition if a connector is loose or heat is present.
Vehicle data or warnings missing
Confirm the correct CANBUS and vehicle route, original-board transfer, configuration and connector seating. Record a continuous video showing ignition, displayed data and warning behaviour.
Steering controls do not respond
Check that the correct vehicle configuration and adapter were supplied and that all CAN-related plugs are locked. Do not assume every button keeps identical short-press or long-press behaviour.
Display restarts or flickers
Stop testing and inspect power, ground, connector engagement and trapped wiring. Repeated restart while driving is a stop-use condition, not a cosmetic issue.
Mask will not sit flush
Remove the cluster and inspect screw alignment, cable placement and clip engagement. Do not pull a misaligned housing into position with the screws.
CarPlay or Android Auto is unavailable
Confirm that the purchased configuration includes the function and that the required connected-system route has been completed. Provide the order configuration, system version and a video of the connection attempt.
Prepare this evidence so long-term iKAGOO support can diagnose the cause
Send the order number, vehicle model and year, LHD/RHD position, original-system information, photos of every connector and adapter, original-board installation photos, system and CAN settings, and a continuous video showing ignition startup and the fault. This gives support enough evidence to separate wiring, configuration, software and hardware causes.
Transparent buyer assessment
The three iKAGOO checks for this 2015–2018 NTG5.0 route
These checks show why the upgrade is valuable, how closely the confirmed route works with the original vehicle, and whether the installation matches the buyer's skill level. The score is a purchasing guide, not a claim that every unconfirmed W205 or X253 has identical hardware or functions.
Behov av uppgradering
The upgrade changes a display used on every journey and adds daily cockpit value beyond simply repairing an ageing analog cluster.
The result combines driver-view visibility, cockpit modernisation, vehicle-data presentation, connected map/phone display value and long-term ownership usefulness.
What raises the score
- The original analog cockpit looks and feels a generation older.
- The driver wants navigation and connected information closer to the line of sight.
- The vehicle is expected to remain in long-term ownership.
What lowers the score
- The factory cluster already meets the owner's needs and remains in excellent condition.
- The buyer wants only a basic repair rather than a cockpit transformation.
- Connected display functions are not important to the buyer.
Choose this upgrade when the goal is a genuine digital-cockpit change and useful daily display value—not only the lowest-cost replacement for a working analog cluster.
Kompatibilitet med originalfordon
The score describes the confirmed route's fit, data retention and control integration. It does not mean that 9% of original functions are automatically lost.
The assessment covers dashboard fit, original mainboard retention, factory data and warnings, steering-wheel controls, connector/CANBUS route and iKAGOO photo review before supply.
What raises the score
- The vehicle matches the confirmed 2015–2018 W205 / X253 NTG5.0 route.
- The dashboard, original cluster and wiring remain factory-standard.
- All requested vehicle photos and configuration details are supplied before ordering.
Why it is not 95+
- Exact behaviour still depends on year, market, NTG route, LHD/RHD layout and previous modifications.
- The interface and some control behaviour can differ from a factory Mercedes digital cluster.
- Supported parking or connected information must be verified on the confirmed configuration.
Submit the exact model, production year, market, dashboard and original-cluster evidence before ordering. Do not select a version only from exterior model name or dashboard appearance.
Svårighetsgrad vid installation
This is not a simple screen swap. It includes trim removal, original-cluster disassembly, mainboard transfer, matched connections and a complete safety-function test.
The level is formed by the number of physical stages, delicate electronics handling, original-board transfer, connector verification, test requirements and the consequences of incorrect critical data.
What makes it manageable
- The photographed guide documents 16 physical stages in sequence.
- The intended confirmed route uses matched plugs without intentional cutting of the factory main harness.
- Original screw positions and the vehicle-specific mask support reversible installation work.
What makes it advanced
- The original cluster must be opened and its electronics transferred carefully.
- Static discharge, damaged clips, reversed plugs or trapped wiring can cause failure.
- Speed, warnings, gear, fuel and temperature must be verified before driving.
Proceed as experienced DIY only when you are comfortable with trim work, circuit-board handling and complete function testing. Otherwise use a professional automotive-electronics installer.
Installation result
What changes from the original analog cluster
Före
- Factory analog dial layout with a smaller centre information area
- Older driver-interface appearance
- Original cluster hardware and familiar factory presentation
After the confirmed upgrade
- 12.3-inch IPS digital driver display
- Vehicle data and supported warnings through the matched route
- Multiple display themes and connected functions on the confirmed configuration
- Original driver-cluster location with a vehicle-specific mask
Buyer and installer questions
Mercedes W205 digital cluster installation FAQ
Will this guide work for every Mercedes W205 or GLC X253?
Nej, det gör jag inte. The physical sequence documents one board-transfer route. The linked iKAGOO product is for confirmed 2015–2018 W205 / X253 NTG5.0 vehicles. Later NTG5.5, NTG6.0, regional or modified vehicles require separate confirmation.
Can I install the cluster without transferring the original mainboard?
No, not for the route shown here. The source images specifically document retaining and transferring the original cluster electronics. Use only the instructions supplied for the confirmed product version.
Does the normal installation require cutting the factory wiring?
Nej, det gör jag inte. The intended supported route uses matched connectors and adapters without intentional cutting of the factory main harness. Stop if cutting, repinning or forcing a connector appears necessary.
Can an experienced owner install it at home?
Det beror på. The Installation Ease Level is Level 3 Advanced DIY. The installer must be comfortable with dashboard trim, delicate circuit-board transfer, connector inspection and complete safety-function testing.
Will steering-wheel controls and vehicle warnings still work?
Yes, when supported and correctly matched. The current product route supports steering-wheel controls, vehicle data, warnings and parking information after correct connection and setup. Exact behaviour must be tested before final reassembly.
Does the digital cluster include Wireless CarPlay and Android Auto?
Yes, on the confirmed current product configuration. The display and control route still depends on the matched vehicle and connected system. Do not assume the same behaviour on an unconfirmed NTG or later model-year route.
Vad ska jag skicka innan jag beställer?
Yes, send clear vehicle evidence. Provide the model, production year, market, LHD/RHD position, complete dashboard photo, original cluster switched on and connector photos when requested.
What should I do if the new cluster shows incorrect speed or warnings?
Stop using it. Do not drive while relying on incorrect critical information. Restore the original cluster where technically possible and send iKAGOO a continuous video plus connector, board and configuration evidence.
Is an aftermarket digital cluster identical to a factory Mercedes cluster?
Nej, det gör jag inte. It is a vehicle-specific aftermarket upgrade designed for an integrated OEM-style result. Interface appearance, control behaviour and some functions can differ from the original factory cluster.
Why should I buy from iKAGOO instead of choosing only the lowest price?
Because the hardware may need continuing support. This upgrade can involve compatibility confirmation, original-board transfer, configuration, CarPlay or Android Auto setup, supported map-display settings, software help and later fault diagnosis. iKAGOO retains the order and supplied-version context so support can continue after delivery rather than ending when the parcel is shipped.
Will iKAGOO still help after the cluster has been installed?
Yes, within the applicable support and policy boundaries. Keep the order number, vehicle details and installation evidence. Later software, settings, function or fault questions can then be assessed against the original supplied configuration instead of starting from an unknown product history.
Does CarPlay or the map run independently inside the cluster?
No, not as a universal independent system. On the confirmed configuration, supported CarPlay, Android Auto and navigation information are displayed through the matched connected-system route. Exact display and control behaviour depends on the confirmed vehicle, main system and setup.
What makes long-term support important for a digital instrument cluster?
It protects the usability of the upgrade. A later black screen, restart, warning, configuration issue, software change or phone-integration problem may require the correct files and knowledge of the original version. Without that history, a physically installed unit can become difficult or expensive to recover.
Related iKAGOO resources
Compatibility, standards and purchase protection
Purchase the correct version with continuing support
Choose the product only after the vehicle route is confirmed
iKAGOO uses the vehicle year, market, steering position, original NTG system, dashboard, cluster and connector evidence to prepare the correct version and preserve the order context needed for installation, setup, software assistance and later fault diagnosis.
Dedicated 2017 NTG5.0 route
For confirmed 2017 Mercedes C-Class W205 and GLC X253 vehicles using the listed route.
Buy the 2017 Version2015–2018 NTG5.0 route
For confirmed 2015–2018 Mercedes W205 / X253 vehicles using the broader listed route.
Buy the 2015–2018 Version





Add comment